XCTrack Pro Manual for AIR³

For AIR³ 7.2, please go to this page:

This page describes the main features of AIR³ 7.3 with XCTrack. Check the other sections to learn more about the different features of XCTrack.

Videos have been produced to explain the different features of XCTrack Pro. Check the videos tuto page to learn quickly how to use XCTrack Pro.

Click on the + sign to read the details.

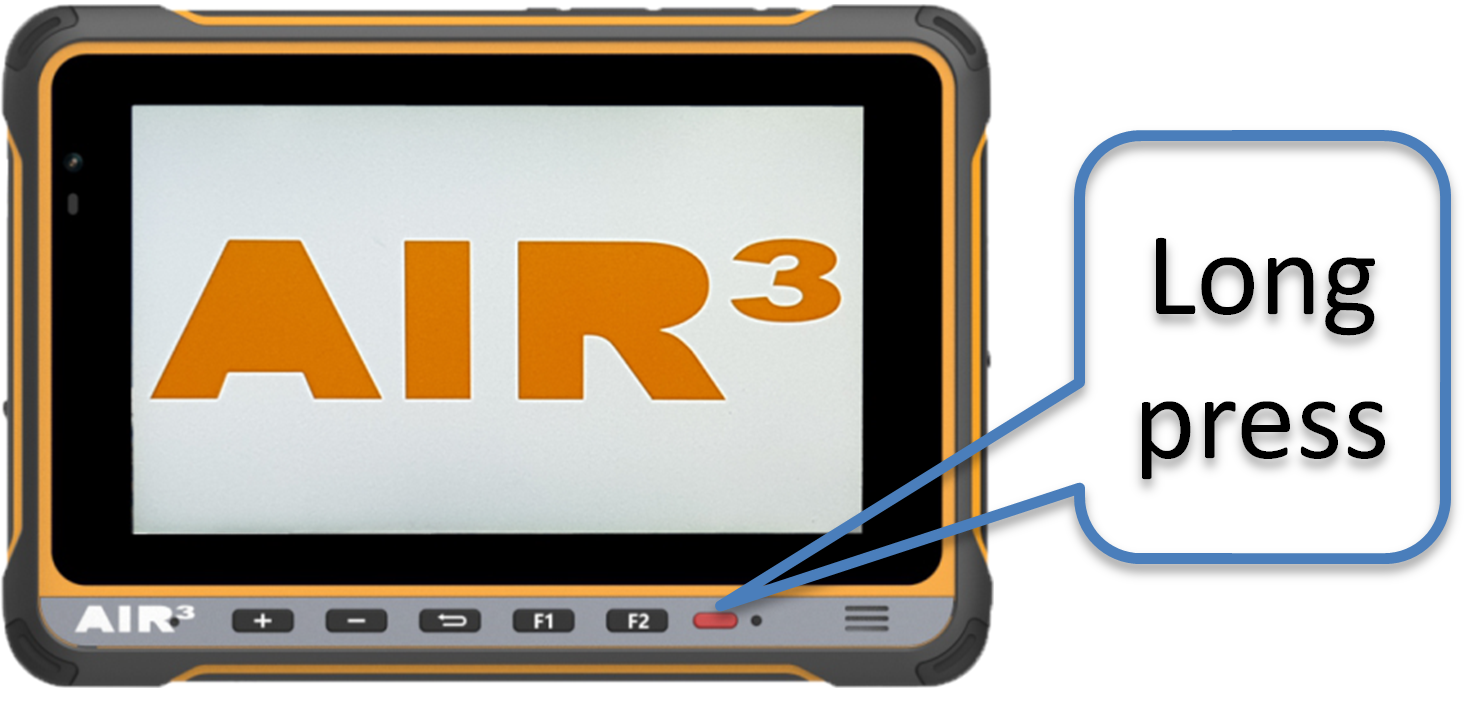
[accordion][spoiler title=”Start up” open=”yes” style=”default” icon=”plus” anchor=”Xctrack-Launch” class=””]

Long press on the red power button. Air³ boots up.  XCTrack is automatically launched.

[/spoiler]
[/accordion]

[accordion][spoiler title=”XCTrack launch” open=”yes” style=”default” icon=”plus” anchor=”Xctrack-Launch” class=””]

XCTrack pro is launched at startup of AIR³, thanks to AIR³ Manager. If you quit XCTrack, you can easily restart it by clicking on the main widget on the desktop.

[/spoiler] [/accordion]


AIR³ buttons and interface (outside XCTrack)

Button


1

2

3

4

5

Short press


Reset/Forced power off

Stand by On/Off (2X=camera)

Back

Volume –

Volume +

Long press


Power On/Off/  -Restart – Screenshot – Emergency

Desktop settings

Interface


6

7

8

9

10

11

12


Earphone jack 3.5 mm (US type)

Fanet/Flarm antenna (7.3+)

MicroSD card

Sim card

USB type C

USB Pogopin

Speaker


AIR³ buttons with XCTrack

Button


1

2

3

4

5

6

Short press


Stand by On/Off (2X=camera)

Brightness –

Brightness +

Toggle map panning – Back

Zoom out

Zoom in

Long press


Power On/Off/  -Restart – Screenshot – Emergency

Next waypoint

Previous waypoint

Menu

Next page

Previous page

[accordion][spoiler title=”Open menu” open=”yes” style=”default” icon=”plus” anchor=”Open-Menu” class=””]

To open XCTrack menu, simply swipe down on the screen with your finger (or with touchscreen gloves), or long press the Back button.

[/spoiler] [/accordion]

[accordion][spoiler title=”Zoom in/Zoom out” open=”yes” style=”default” icon=”plus” anchor=”Zoom-In-Zoom-Out” class=””]

To zoom in or out, you can either click (short press) on the screen on the + or – widget with your finger (naked or with touchscreen gloves) or click (short press) on the + or – volume button. Read more details about the Map zoom button in the Action buttons subsection of the XCTrack Pro widgets manual.

[/spoiler] [/accordion]

[accordion][spoiler title=”Switch pages” open=”yes” style=”default” icon=”plus” anchor=”Switch-Pages” class=””]

To switch pages, you can either swipe left or right on the screen with your finger (naked or with touchscreen gloves) or  click (long press) on the + or – volume button. Read more details about how to link buttons with specific actions in the Key bindings section of Menu/Preferences/Key bindings.

[/spoiler] [/accordion]

[accordion][spoiler title=”Previous/Next waypoint” open=”yes” style=”default” icon=”plus” anchor=”Previous-Next-Waypoint” class=””]

To change waypoints (previous or next one in your route/task), you can either click (long press) on the screen on the ← or → widget with your finger (naked or with touchscreen gloves) or  click (long press) on the F1 or F2 button.

Read more details on how to configure the Navigation button in the “Action buttons” subsection of the XCTrack Pro widget manual

[/spoiler] [/accordion]

[accordion][spoiler title=”Increase/decrease brightness” open=”yes” style=”default” icon=”plus” anchor=”Increase-Decrease-Brightness” class=””]

To increase or decrease the brightness, you can click (short press) on the screen on the brightness widgets + or – with your finger (naked or with touchscreen gloves) or click (short press) on the F1 or F2 button.

Increasing the brightness provides you with better readability, decreasing the brightness provides you with more autonomy (a brightness of 50% gives you almost twice the autonomy). Look at the comparison made here and the video that shows the same.

Having the screen perpendicular to your look greatly increases readability and greatly reduces the need for brightness. If your cockpit cannot be tilted, we recommend using the AIR³ Fabric Base to tilt the instrument right in front of your eyes. If you are not using an AIR³, you can also use the Fabric Base.

Thanks to the brightness widgets and buttons, you can easily adjust the brightness need according to the flight conditions. Read more details about the Display brightness widgets in the Action buttons subsection of the XCTrack Pro widgets manual 

[/spoiler] [/accordion]

[accordion][spoiler title=”Make a call” open=”yes” style=”default” icon=”plus” anchor=”Make-A-Call” class=””]

To make a call, you can click (long press) on a pre-configured phone call widget with your finger (naked or with touchscreen gloves).

As soon as the call is made, you can take your brakes back in hand to control your wing. The built in speaker and microphone will let you communicate without losing control of your wing.

Check the quick video how to configure a Phone call widget here . Read more details on how to configure the Phone button in the  “Action buttons”  subsection of the XCTrack Pro widgets manual

[/spoiler] [/accordion]

[accordion][spoiler title=”Turn on/off vario sound” open=”yes” style=”default” icon=”plus” anchor=”Turn-On-Off-Vario-Sound” class=””]

To turn on or off the acoustic vario (both vario and weak lift), you can click (short press) on the screen on the vario button widget with your finger (naked or with touchscreen gloves).

Read more details on how to configure the Vario button in the “Action buttons” subsection of the XCTrack Pro widgets manual

Alternatively, you can also enable or disable the vario in the Menu/Preferences/Sound/Acoustic vario.

[/spoiler] [/accordion]

[accordion][spoiler title=”Contextual menu for navigation or airspace” open=”yes” style=”default” icon=”plus” anchor=”Contextual-Menu” class=””]

To access the contextual menu,

1) swipe up on the widget map ( see more details about XC Map or Task Map widgets in the XCTrack Pro widgets manual) to enter a special edit/panning mode,

2) long click on the map at the exact location  you want to apply one of these actions:

Navigate to a point on the mapSee the Navigation page for more details

Create a new waypointSee the Navigation page for more details

Select an Airspace zone to review the details or change the status. See more details in the Airspace section of the Preferences page of the XCTrack Pro Manual. Once you enter this Edit/panning mode, all the airspace zones that are set on Automatic or Active will be displayed (even the one not virtually active but set on automatic), so that you are able to change the status.

[/spoiler] [/accordion]

[accordion][spoiler title=”Enable Fanet and Flarm (7.3+)” open=”yes” style=”default” icon=”plus” anchor=”Quit-Xctrack” class=””]

To enable Fanet and Flarm Tx (7.3+), you can use either XCTrack or XC Guide.

With XCTrack, go to XCTrack Menu/Preferences/Connection & Sensors. In FANET/FLARM section, enable “Use internal FANET module”.

Check the FANET+ logo in the status line:

For more details regarding the Fanet and Flarm module, read this FAQ…

With XC Guide, just launch XC Guide and it will detect automatically the internal Fanet and Flarm Module and activate it automatically. More details about the specificities of XC Guide for AIR³ here.

[/spoiler] [/accordion]

[accordion][spoiler title=”Quit XCTrack” open=”yes” style=”default” icon=”plus” anchor=”Quit-Xctrack” class=””]

To quit XCTrack, swipe down on the screen with your finger or with touchscreen gloves to get the menu, then click on the quit button.

[/spoiler] [/accordion]

Next section

en_USEnglish